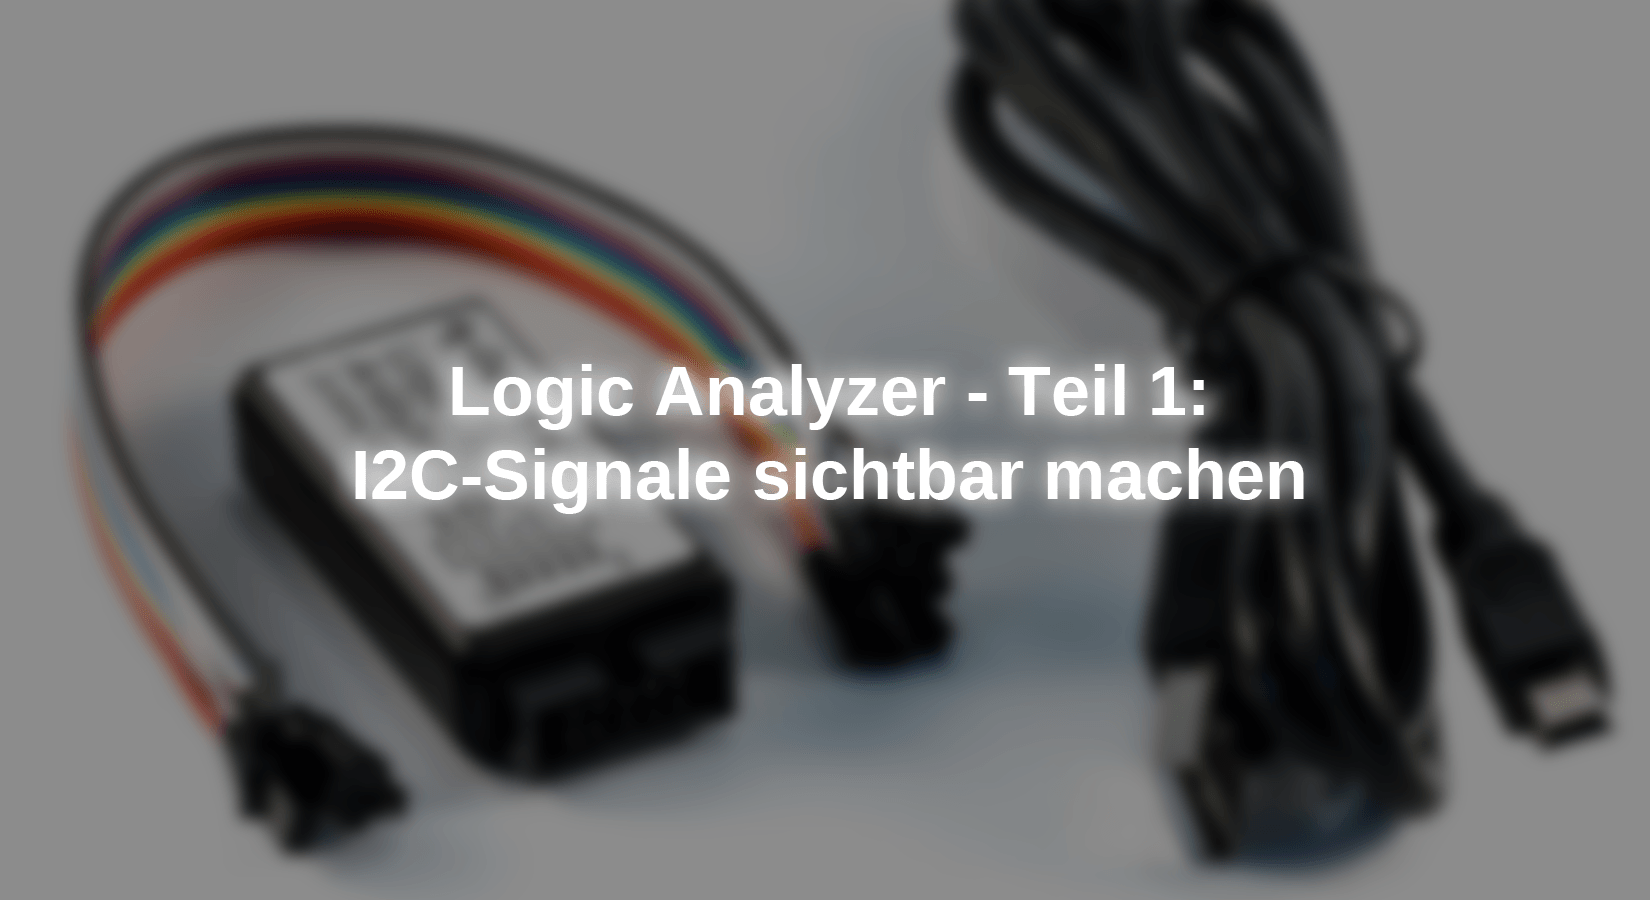
The Logic Analyzer is a small, inexpensive device with which you can make the data signals of different bus systems visible. As described in the eBook, I load that Analysis program from the Internet. After installation, I connect the Logic Analyzer to a USB port; This is recognized by the software. With mouse clicks of the red-marked buttons, I choose I2C on channels 0 and 1 and start the data recording with the white triangle on a green circle.

(You have probably already seen that the numbering of the connections on the Logic Analyzer at 1 begins, the typical trap: So CH1 becomes channel 0 in the software.)

First of all, I start the evaluation of the I2C bus signal using the example of the Real Time Clock DS3231.
First I load the sketch I2C scanner on my microcontroller to read the i2C address (s) of the connected Real Time Clock (RTC):
Essentially "calls" the master with the for loop
for (address = 1; address < 127; address++ )
All possible I2C devices and waits for the answer NAK (= not acknowledged = no device with the address) or field (=Acknowleded = device found at the specified address).
Short repetition to I2C: I²C is as Master slave-Bus designed. A data transfer is always initiated by a master (microcontroller) by sending bytes. The slave (e.g. sensor or RTC) mentioned via an address reacts to this. The first 7 bits of the bytes mark the address of the slave (theoretically 2 high 7 = 128 addresses), and the last bit signals the slave whether it should receive or send data.
Here is the output for the connected RTC in the serial monitor; A device - two addresses? We clarify that later.

Interesting the image of the transferred bits and bytes, evaluated by Logic Analyzer And the recommended software. Here is the excerpt for the addresses 0x63 to 0x68:


The addresses 0x63 to 0x67 provide NAK, the transmission of the next address will continue immediately. As expected, the address is 0x68. The transmission on the I2C bus is briefly interrupted because the sketch outputs the address found in the serial monitor and then continues.
The same picture had been shown at the address 0x57. There is another i2C device on the small circuit board. The English eBook says: The Module Consists of A DS3231 RTC Clock Chip and Atmel AT24C32 EEPROM CHIP. The AT24C32 has a memory storage capacity of 32kb and uses the i2c bus interface with a 0x57 address which can be modified.
So: the EEPROM chip, which we do not use here, has the address 0x57.
Now the Real Time Clock is used. I have the Program library RTClib from Adafruit installed with me. This comes with several files with the ending .cpp for various real time clocks and one Example sketch for RTC DS3231.
Here is an example of a screenshot from the serial monitor with the edition of the data of the sample sketch every three seconds (by the way at 57600 baud):

To make a clear assignment of the program run to the measurement result of the Logic Analyzers To be able to carry out, I extend the time between two queries of the RTC.
The Evaluation software delivers both the image of the signal course and table of the bytes sent.
Let's see if we "find" the following data from the serial monitor of the Arduino IDE:
|
19: 21: 19.225 -> 2021/11/22 (Monday) 19:21:10 |
|
19: 21: 19.225 -> Since Midnight 1/1/1970 = 1637608870S = 18953d |
|
19: 21: 19.225 -> NOW + 7D + 12H + 30m + 6S: 2021/11/30 7:51:16 |
|
19: 21: 19.225 -> Temperature: 22.00 C |
The entire signal lasts 14 ms; However, you don't recognize much.

So I turn my mouse on the roller wheel and enlarge the individual sections:


Now you can see the SDA and SCL signal. By the way, with a right mouse click into the colored data above the SDA signal you can choose whether the output format should be binary, decimal, or hexadecimal. Accordingly, the number format in the table on the right edge of the program window changes.
In both pictures, the master signals the Slave 0x68 (= RTC) that it will write something (write). In the upper picture he sends the 0x00 tab, and in the lower 0x11. Then the master signals the Slave 0x68 that it is expecting data (read). Seven bytes are transmitted in the upper picture, and two bytes in the lower one.
From the Library and the datasheet we can see that the register address 0x00 and the following six registers transmit the current time and the date, the register addresses 0x11 and 0x12.
Extract from library rtc_ds3231.cpp
Line 1 - 13:
///
///
///
///
///
///
///
///
/**************************************************************************/
Line 69ff:
 DateTime RTC_DS3231 ::snow() {
   uint8_t buffer[7];
   buffer[0] = 0;
   I2C_DEV->write_then_read(buffer, 1, buffer, 7);
Extract from the data sheet:

Here the transferred data in tabular form
|
Surname |
type |
address |
Data_hex |
Data_bin |
from register |
|
I2C |
begin |
||||
|
I2C |
address |
0x68 |
|||
|
I2C |
data |
0x00 |
0b00000000 |
Tab |
|
|
I2C |
begin |
||||
|
I2C |
address |
0x68 |
|||
|
I2C |
data |
0x10 |
0B00010000 |
0x00 |
|
|
I2C |
data |
0x21 |
0b00100001 |
0x01 |
|
|
I2C |
data |
0x19 |
0B00011001 |
0x02 |
|
|
I2C |
data |
0x01 |
0b00000001 |
0x03 |
|
|
I2C |
data |
0x22 |
0B00100010 |
0x04 |
|
|
I2C |
data |
0x11 |
0B00010001 |
0x05 |
|
|
I2C |
data |
0x21 |
0b00100001 |
0x06 |
|
|
I2C |
Stop |
||||
|
I2C |
begin |
||||
|
I2C |
address |
0x68 |
|||
|
I2C |
data |
0x11 |
0B00010001 |
Tab |
|
|
I2C |
begin |
||||
|
I2C |
address |
0x68 |
|||
|
I2C |
data |
0x16 |
0B00010110 |
0x11 |
|
|
I2C |
data |
0x00 |
0b00000000 |
0x12 |
|
|
I2C |
Stop |
The evaluation based on the table from the data sheet is amazingly simple:
|
Address |
Bit 7 MSB |
Bit 6 |
Bit 5 |
Bit 4 |
Bit 3 |
Bit 2 |
Bit 1 |
Bit 0 LSB |
Evaluation |
|
00h |
0 |
10 seconds |
Seconds |
||||||
|
0B00010000 |
0 |
0 |
0 |
1 |
0 |
0 |
0 |
0 |
10 |
|
01h |
0 |
10 minutes |
Minute |
||||||
|
0b00100001 |
0 |
0 |
1 |
0 |
0 |
0 |
0 |
1 |
21 |
|
02h |
0 |
12/24 |
On/pm 20 hours |
10 Hour |
House |
||||
|
0B00011001 |
0 |
0 |
0 |
1 |
1 |
0 |
0 |
1 |
19 |
The evaluation of the bits in the 0x02, 0x01, and 0x00 tabs results in the time 19:21:10. Bingo!
For the temperature we look again at the Library RTC_DS3231.cpp and in the datasheet:
Line 114ff:
 float RTC_DS3231 ::getting temperature() {
   uint8_t buffer[2] = {Ds3231_t temperature, 0};
   I2C_DEV->write_then_read(buffer, 1, buffer, 2);
   return (float)buffer[0] + (buffer[1] >> 6) * 0.25f;
|
Address |
Bit 7 MSB |
Bit 6 |
Bit 5 |
Bit 4 |
Bit 3 |
Bit 2 |
Bit 1 |
Bit 0 LSB |
Evaluation |
|
|
11h |
Sign |
Data |
Data |
Data |
Data |
Data |
Data |
Data |
||
|
0B00010110 |
0 |
0 |
0 |
1 |
0 |
1 |
1 |
0 |
22 |
|
|
12h |
Data |
Data |
0 |
0 |
0 |
0 |
0 |
0 |
||
|
0b00100001 |
0 |
0 |
0 |
0 |
0 |
0 |
0 |
0 |
0 |
|
While the evaluation of the occurrence of the temperature from register 0x11 is simple (22 ° C), you have to move the two data bits for the decimal places to the right (>> 6), and the value of the remaining two bits with 0.25 multiply.
The basics for this can be found in the datasheet on page 15:
Temperature Register (11h–12h)
Temperature is represented as a 10-bit code with a resolution of 0.25 ° C and is accessible at locations 11h and 12h. The temperature is encoded in Two’s complement format. The Upper 8 Bits, The Integer portion, are at location 11H and the Lower 2 Bits, The Fractional Portion, Are In The Upper Nibble at Location 12h.
How nice that the program library takes this work. But: We have been able to find all the values of data transmission in the SDA signal.
It's not always that easy. I started my attempts with my favorite sensor, the BME280. I2C address and the tab addresses for temperature, air pressure, and rel. I have been able to identify. However, the calculation of these values from the transferred bytes is unfortunately extremely complex. Fortunately, the formulas from the Bosch data sheet are implemented in the program library.
Therefore only a picture of the first call of the BME280 with the address 0x76 = 0b0111 0110:

Conclusion: If you select the correct data log (here I2C) in the Logic Analyzer Software and connect the data bus with the correct channels, you will receive the data transmission, optionally as a decimal, hexadecimal, or binary number.
Next time I will examine more bus systems.


1 comment
Gerhard Chvatal
Hallo!
Prinzipiell ein sehr interessanter Beitrag, den ich gerne um den folgenden Aspekt ergänzen möchte.
Für Ihren und viele andere Logikanalysatoren, gibt es eine sehr gute OpenSource Analysator-Software, die auf allen gängigen Betriebssystemen läuft.
Diese Software heißt Sigrok und das zugehörige graphische Frontend heißt PulseView und bietet eine Vielzahl (130+) von implementierten Decodern (I²C, SPI, I²S …) an. Diese können dazu noch selbst erweitert werden.
Vielleicht eine interessante Open-Source Alternative für den Logikanalysator.
https://sigrok.org/wiki/Main_Page
Mit freundlichem Gruß,
Gerhard Chvatal, OE1GCA