First of all, I would like to thank all our readers for the lively feedback on our article “Platformo installation“.
Many read the article and also installed the software.
So today I would like to give some little tips on getting started.
1. Find and install libraries
In the Arduino IDE there is the handy library manager. This allows you to search for libraries quite easily, install them, and also keep them up to date.
A similar function is offered by the "Libraries" button in PlatformIO
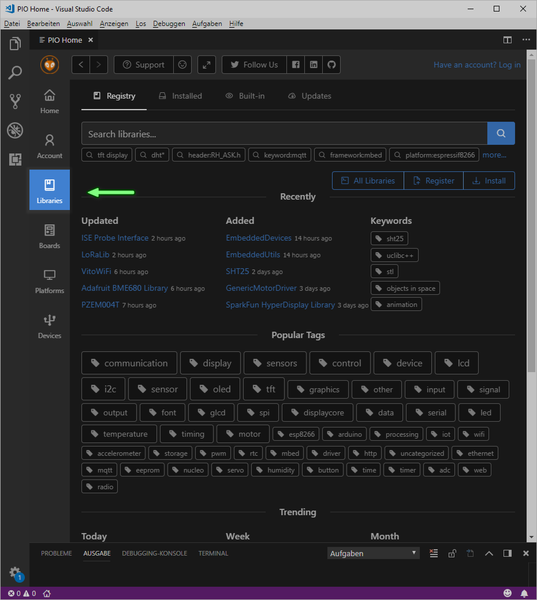
First of all I want to install my favorite library for controlling displays: U8g2 from OliKraus. To do this, I enter the name of the library in the search bar: "U8g2" and confirm the entry with Enter, or click on the magnifying glass icon:

The first hit is the desired library. By clicking on the library we get to the overview page of the library. At this point, all the important information about the library is displayed, and we can select the desired version (I usually take the latest), and by clicking on the "Install" button, we can install the library.

After a few moments, the message “Congrats! U8G2 @ 2.23.x has been successfully installed! ”.

By clicking on the "Installed" tab, we can see which libraries are installed and remove them if necessary. With a click on "Reveal" the file manager is opened and shows us the folder with the installed libraries.
So the libraries are no longer installed in our own documents under "C:\Users\<name>\Documents\Arduino\libraries" but under "C:\Users\<name>\.platformio\lib".
2. Create a first own project
Before we can use the installed library, we need to create a project.
To do this, we go to the "Home" button at the top, and click "+ New project" at "Quick Access".

In the next window we assign a name and select the microcontroller. In the example I take our Nano V3 - so I enter Nano for "Board" and select "Arduino Nano ATmega328". I leave the entry for "Framework" at "Arduino". Experienced users can choose between other frameworks depending on the board.

Now the project is created. This may take a few minutes, especially if it is the first project with a particular microcontroller, and all the necessary files must be downloaded from the Internet.

After that the explorer appears on the left side and our project "OLED-TEST" is displayed. If we expand "src" we see a file with the name "main.cpp". This corresponds to our empty Arduino Sketch, with "void Setup()" and "void loop()".

At the very bottom of the blue status bar, a number of small icons appear. These are buttons, and allow us to access various functions. Using "Build" we can compile the code. "Upload" uploads the compiled code to the microcontroller.
As a test, I compile the empty sketch and upload it. The following output appears in the console:
> Executing task: C:\Users\chrisp\.platformio\penv\Scripts\platformio.exe run --target upload <
Processing nanoatmega328 (platform: atmelavr; board: nanoatmega328; framework: arduino)
---------------------------------------------------------------------------
PackageManager: Installing tool-avrdude @ ~1.60300.0
Downloading [####################################] 100%
Unpacking [####################################] 100%
Verbose mode can be enabled via `-v, --verbose` option
PLATFORM: Atmel AVR > Arduino Nano ATmega328
SYSTEM: ATMEGA328P 16MHz 2KB RAM (30KB Flash)
Library Dependency Finder -> http://bit.ly/configure-pio-ldf
LDF MODES: FINDER(chain) COMPATIBILITY(soft)
Collected 25 compatible libraries
Scanning dependencies...
No dependencies
Compiling .pioenvs\nanoatmega328\src\main.cpp.o
Archiving .pioenvs\nanoatmega328\libFrameworkArduinoVariant.a
Compiling .pioenvs\nanoatmega328\FrameworkArduino\CDC.cpp.o
Compiling .pioenvs\nanoatmega328\FrameworkArduino\HardwareSerial.cpp.o
Compiling .pioenvs\nanoatmega328\FrameworkArduino\HardwareSerial0.cpp.o
Compiling .pioenvs\nanoatmega328\FrameworkArduino\HardwareSerial1.cpp.o
Compiling .pioenvs\nanoatmega328\FrameworkArduino\HardwareSerial2.cpp.o
Compiling .pioenvs\nanoatmega328\FrameworkArduino\HardwareSerial3.cpp.o
Compiling .pioenvs\nanoatmega328\FrameworkArduino\IPAddress.cpp.o
Compiling .pioenvs\nanoatmega328\FrameworkArduino\PluggableUSB.cpp.o
Compiling .pioenvs\nanoatmega328\FrameworkArduino\Print.cpp.o
Compiling .pioenvs\nanoatmega328\FrameworkArduino\Stream.cpp.o
Compiling .pioenvs\nanoatmega328\FrameworkArduino\Tone.cpp.o
Compiling .pioenvs\nanoatmega328\FrameworkArduino\USBCore.cpp.o
Compiling .pioenvs\nanoatmega328\FrameworkArduino\WInterrupts.c.o
Compiling .pioenvs\nanoatmega328\FrameworkArduino\WMath.cpp.o
Compiling .pioenvs\nanoatmega328\FrameworkArduino\WString.cpp.o
Compiling .pioenvs\nanoatmega328\FrameworkArduino\abi.cpp.o
Compiling .pioenvs\nanoatmega328\FrameworkArduino\hooks.c.o
Compiling .pioenvs\nanoatmega328\FrameworkArduino\main.cpp.o
Compiling .pioenvs\nanoatmega328\FrameworkArduino\new.cpp.o
Compiling .pioenvs\nanoatmega328\FrameworkArduino\wiring.c.o
Compiling .pioenvs\nanoatmega328\FrameworkArduino\wiring_analog.c.o
Compiling .pioenvs\nanoatmega328\FrameworkArduino\wiring_digital.c.o
Compiling .pioenvs\nanoatmega328\FrameworkArduino\wiring_pulse.S.o
Compiling .pioenvs\nanoatmega328\FrameworkArduino\wiring_pulse.c.o
Compiling .pioenvs\nanoatmega328\FrameworkArduino\wiring_shift.c.o
Archiving .pioenvs\nanoatmega328\libFrameworkArduino.a
Linking .pioenvs\nanoatmega328\firmware.elf
Building .pioenvs\nanoatmega328\firmware.hex
Checking size .pioenvs\nanoatmega328\firmware.elf
Memory Usage -> http://bit.ly/pio-memory-usage
DATA: [ ] 0.4% (used 9 bytes from 2048 bytes)
PROGRAM: [ ] 1.4% (used 444 bytes from 30720 bytes)
Configuring upload protocol...
AVAILABLE: arduino
CURRENT: upload_protocol = arduino
Looking for upload port...
Auto-detected: COM25
Uploading .pioenvs\nanoatmega328\firmware.hex
avrdude: AVR device initialized and ready to accept instructions
Reading | ################################################## | 100% 0.00s
avrdude: Device signature = 0x1e950f (probably m328p)
avrdude: reading input file ".pioenvs\nanoatmega328\firmware.hex"
avrdude: writing flash (444 bytes):
Writing | ################################################## | 100% 0.15s
avrdude: 444 bytes of flash written
avrdude: verifying flash memory against .pioenvs\nanoatmega328\firmware.hex:
avrdude: load data flash data from input file .pioenvs\nanoatmega328\firmware.hex:
avrdude: input file .pioenvs\nanoatmega328\firmware.hex contains 444 bytes
avrdude: reading on-chip flash data:
Reading | ################################################## | 100% 0.11s
avrdude: verifying ...
avrdude: 444 bytes of flash verified
avrdude: safemode: Fuses OK (E:00, H:00, L:00)
avrdude done. Thank you.
======================= [SUCCESS] Took 5.87 seconds =======================
Das Terminal wird von Aufgaben wiederverwendet, drücken Sie zum Schließen eine beliebige Taste.
At the bottom of the explorer there is a file called "platformio.ini". If we select this, we recognize the selected microcontroller. At this point we can change the port for the upload, if needed.
For this we can add the option "upload_port" in this file, e.g. with the line "upload_port = COM25".
You can find more upload options at https://docs.platformio.org/en/latest/projectconf/section_env_upload.html#upload-port.
Tip: on the PlatformIO: Home page under "Devices" all connected and recognized boards are listed:
PlatformIO: Tab: Devices

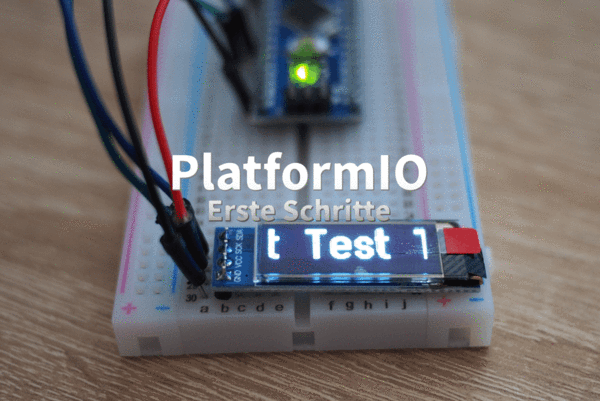
Now we can integrate the library using #include. I use the example sketch from our eBook to 0.91 "I²C OLED display with small adjustments.
#include <Arduino.h>
#include <U8g2lib.h>

U8G2_SSD1306_128X32_UNIVISION_F_HW_I2C u8g2(U8G2_R0, /* reset=*/ U8X8_PIN_NONE);
u8g2_uint_t offset;
u8g2_uint_t width;
const char *text = "Test ";

void setup() {
    u8g2.begin();
    u8g2.setFont(u8g2_font_logisoso32_tf);
    width = u8g2.getUTF8Width(text);
    u8g2.setFontMode(0);
}

void loop() {
    u8g2_uint_t x;
    u8g2.firstPage();
    do {
        x = offset;
        u8g2.setFont(u8g2_font_logisoso32_tf);
            do {
             u8g2.drawUTF8(x, 32, text);
             x += width;
    } while ( x < u8g2.getDisplayWidth() );
    u8g2.setFont(u8g2_font_logisoso32_tf);
    u8g2.setCursor(0, 64);
    u8g2.print(width);
} while ( u8g2.nextPage() );
offset -= 1;
if ( (u8g2_uint_t)offset < (u8g2_uint_t) - width ){
    offset = 0;
    u8g2.clearBuffer();
    }
}
After compiling and uploading, the text appears on the display:

All beginnings are hard. Switching to a new software is not only hard, but also requires some discipline, as it would be very easy to just quickly start the Arduino IDE and quickly upload the code there.
I hope that this step-by-step guide could help you to resist this temptation.
We would love to hear how your entry into the world of PlatformIO was. Post your experiences in the comments, or send us a quick email. What stumbling blocks did you have to overcome? Can you imagine doing without the Arduino IDE completely? What aspects of PlatformIO would you like to see more blog posts about?
I look forward to your feedback, and say goodbye for today.
Your Markus Neumann
15 comments
Jörn Weise
Hallo Peter,
im Prinzip geht es mit dem einbinden von externen Bibliotheken, siehe dazu https://docs.platformio.org/en/latest/projectconf/sections/env/options/library/lib_extra_dirs.html
Jedoch würde ich das nicht empfehlen, wenn nicht die Libraries sehr speziell sind. Das Prinzip hinter PlatformIO ist, dass jedes OS die Libs runterladen kann und dort abspeichert, wo es passt. Wenn nun Extra-Libs angenommen werden, so kann es nachher zum Fehler kommen.
Gruß
Jörn
Peter
Vielen Dank für den tollen Artikel.
Wie ist es möglich, lokal gespeicherte Libraries (Arduino-IDE) in Platformio zu integrieren,, bzw. über die Suchfunktion entsprechenden Libraries zu filtern.
Beispiel: Bei der Suche nach einer Library mit dem Namen “Wire” werden mehr als 600 Treffer angezeigt. Auch solche in denen der Name “Wire” im Namen nicht enthalten ist.
Julia
vielen Dank für den hilfreichen Artikel, ich bin begeistert. Nur das Hochladen auf den ESP32 klappt nicht.
Ich arbeite mit macOS Big Sur Vers. 11.2.3
mit Windows klappt es
Fehler: A fatal error occurred: Failed to connect to ESP32: Timed out waiting for packet header
den Boot Button auf dem ESP32 habe ich gedrückt während des Hochladens,
beste Grüße von Julia
Jürgen Beckamp
Danke für den guten Beitrag,
ich kann Libraries nur in ein Projekt installieren.
Bei mir fehlt der gezeigte Schalter “Install…” (viertes Bild).
Ich habe dort “Add to Project” als einzige Auswahl und muss dann auch das Projekt auswählen in das die Libs installiert werden.
So werden viele “gleiche” Libs in den unterschiedlichen Projektordnern abgelegt.
Es wird jedesmal .pio unter dem Projekt erzeugt und darin ist libdeps\esp32… mit den Libs.
( z.B. für ein Webserverprojekt wird .pio mit 110MB und 167Dateien gross) je nach Projekt und installieren Libs, die beim Upate ja auch berücksichtigt werden.
Den erwähnten Ordner „C:\Users\\.platformio\lib“ habe ich nicht.
Ich habe mein Userverzeichnis auf Laufwerk D: verlegt (weil C: klein ist), und da ist kein Verzeichniss „D:\Users\\.platformio\lib“.
Was muss ich in den Einstellungen ändern um auch ein gemeinsames Liraries-Verzeichnis zu bekommen?
In der platformio.ini habe ich dann z.B. :
lib_deps =
AsyncTCP@^1.1.1
ESP Async WebServer@^1.2.3
Im Main.cpp dann die normalen #include und es geht…
aber die Libs kommen dann wohl aus dem Unterordner .pio aus dem jeweiligen Projekt.
Danke für die Unterstützung
Mit freundlichem Gruß
Jürgen
Markus W
Anntwort für Daniel:
Sehr einfach, indem man auf den src-Ordner im Arbeitsbereich mit der rechten Maustaste klickt und dann “Neue Datei” wählt. Dann benennt man die Datei und sie ist auch gleich als neuer Tab geöffnet.
Ich habe mir hier die “ordentliche” Arbeitsweise mit Header- und Quelltextdateien angewöhnt.
Das einzige, was ich noch nicht vertsnden habe, ist die Verwendung von Git.
Daniel
Hallo, ich bin auch gerade dabei, von der Arduino IDE auf PlatformIO umzusteigen. Vielen Dank für den hilfreichen Beitrag.
In der Arduino IDE kann man den Code eines Projektes (z.B. der Übersichtlichkeit halber) einfach in mehrere .ino Dateien aufteilen.
Wie macht man sowas in PlatformIO?
Viele Grüße
Daniel
R. Otto
Hallo,
ist es möglich aufzuzeigen, wie man mit einem Programmer (zB STK500) oder /und mit dem Bottloader das Programm auf den Arduino überträgt- wo wird das konfiguriert?
Dieter Behm
hallo Herr Markus Neumann,
der Artikel ist super, danke auch für Ihren Einsatz für meine Ersatzlieferung. Nach anfänglichen Problemen komme ich meinem Ziel mit Ihren Artikeln ein Stück näher.
Danke dafür
Dieter Behm
Markus
Ich habe ein Problem mit dem seriellen Monitor unter PlatformIO (in VSC) und dem “ESP32 NodeMCU Module WLAN WiFi Development Board mit CP2102” von Euch.
Unter der Arduinio Ide funktionierte der Zugriff auf die serielle Schnittelle (für Debug-Ausgaben) problemlos.
Unter PlatformIO scheint der ESP32 nicht zu funktionieren, sobald ein “Serial.begin(115200);” in der setup-Funktion erscheint.
Ohne diesen Zugriff auf Serial.XY macht der ESP32 was er soll. (hab mal zum testen die LED blinken lassen)
Welche Einstellungen sind in PlatformIO nötig, damit der serielle Zugriff funktioniert?
Umgebung: MacOS
Einstellungen z.B. für Board habe ich genauso wie hier beschrieben übernommen:
https://docs.platformio.org/en/latest/tutorials/espressif32/arduino_debugging_unit_testing.html
Wer kann mir helfen?
Danke + Gruß
Markus
Bert
Hallo, wie kann mann die Deutsche Sprache Installieren vielen Dank im voraus Gruß Bert
Thomas
Auch vom mir vielen Dank.
Nun kann ich ganz prima Bibliotheken einbinden. Doch wie werde ich die wieder los?
Wie kann man Bibliotheken deinstallieren?
Weiß das jemand?
LG au Berlin
Michael
Danke für diese Anleitung. Dadurch fällt der Wechsel von der Arduino IDE auf PlattformIO leichter :-)
Udo Scharnitzki
Hallo,
es gibt relativ wenige Tutorials, die wie dieses hier, ausführlich und engagiert eine Software vorstellen. Es hat unter Windows 10 alles auf Anhieb geklappt. Für eine Bewertung habe Sie volle Punktzahl mit Auszeichnung verdient.
Vielen, vielen Dank für die Arbeit, die Sie sich gemacht haben. Sowas braucht die Welt!!! Ihnen “ALLES GUTE” weiterhin.
Stephan Strittmatter
Super Artikel, ich bin auch recht schnell von der Arduino IDE auf Platform.io umgestiegen. Die IDE ist um Welten besser.
Bernd
Das hat einwandfrei funktioniert! Vielen Dank für diese Hilfe!